Your cart is currently empty!

Objective: Replicate the OpenDuck Mini project and control it using the RDK X5 development board.
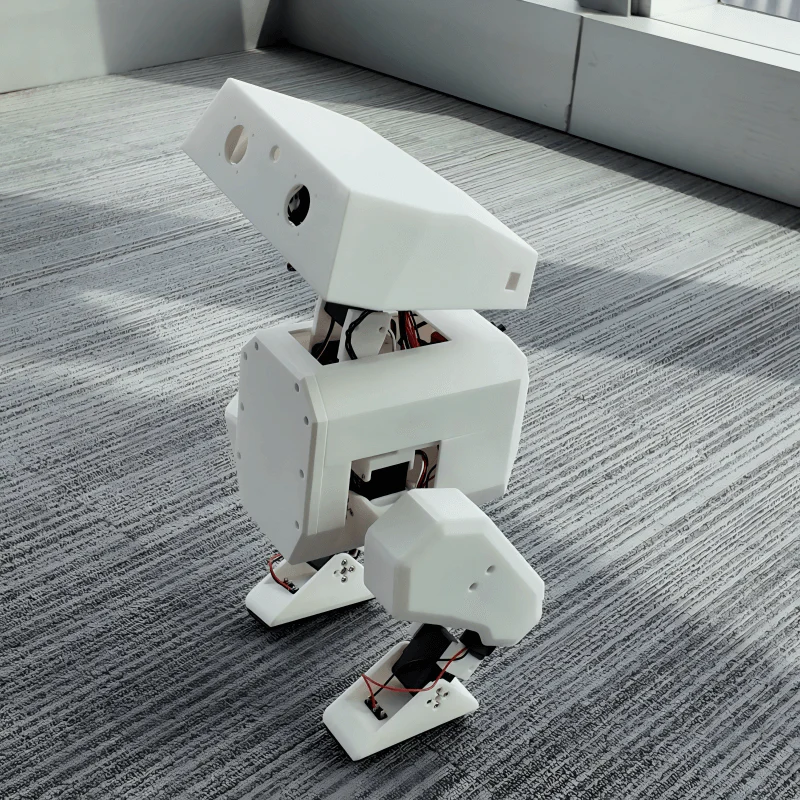
OpenDuck Mini is an open-source robotics project aimed at creating a miniature, low-cost replica of Disney’s BDX Droid. The project was initiated and is maintained by developer Antoine Pirrone (apirrone).
Table of Contents:
▪️ OpenDuck Development Workflow
▪️ OpenDuck Repository Overview
▪️ Raspberry Pi Zero 2W Deployment Process
▪️ Frequently Asked Questions (FAQ)
I. Project Research
1.1 International Projects
Focus on algorithm implementation and community ecosystem.
1.1.1 🇺🇸 OpenDuck Mini
| Project | Description |
|---|---|
| Link | Open_Duck_Mini |
| Hardware Architecture | Raspberry Pi Zero 2W + Feetech ST3215 Servo + IMU |
| Core Features | Ultra-low cost (<$400), fully 3D-printed structure |
| Tech Stack | Sim2Real (MuJoCo), successfully implemented reinforcement learning control on low-cost servos |
| Evaluation | ⭐ Best for beginners, suitable as a low-cost educational tool or desktop display project |
1.1.2 🇺🇸 K-Scale Labs (Stompy)
| Project | Description |
|---|---|
| Link | github.com/kscalelabs |
| Hardware Architecture | Committed to full-stack open source, including self-developed driver boards and host computers |
| Core Features | Large community scale, dedicated to establishing a universal humanoid robot standard (K-Lang) |
| Evaluation | Adopts an “ecosystem” development strategy, aiming to become the Android platform of the robotics field |
1.1.3 🇺🇸 Berkeley Humanoid Lite
| Project | Description |
|---|---|
| Link | berkeley-humanoid-lite |
| Hardware Architecture | High-performance brushless motors + 3D-printed gearboxes |
| Core Features | Academic “low-cost” research platform benchmark (<$5000), designed specifically for reinforcement learning research |
| Evaluation | Hardcore research-oriented, suitable for studying high-dynamic motion control (such as jumping, backflips, etc.) |
1.1.4 🇫🇷 Poppy Project & 🇰🇷 Robotis OP3
| Project | Description |
|---|---|
| Link | Poppy | Robotis |
| Hardware Architecture | Dynamixel high-end servos + x86/SBC |
| Evaluation | ⚠️ Previous generation technology route, relies on expensive Dynamixel servos, not suitable for end-to-end reinforcement learning applications |
1.2 Domestic Projects
Domestic projects are generally more aggressive in brushless motor (BLDC/FOC) applications with stronger hardware performance.
1.2.1 🇨🇳 Kit-Miao (Damiao Technology)
| Project | Description |
|---|---|
| Link | Gitee Repo |
| Hardware Architecture | Damiao joint motors (integrated FOC driver) + STM32/ESP32 |
| Core Features | Mature technical solution, provides complete source code for both MPC and reinforcement learning algorithms |
| Evaluation | ⭐ Highly suitable for secondary development, motor performance is in the first tier of domestic products |
1.2.2 🇨🇳 Unitree Qmini (Yushu)
| Project | Description |
|---|---|
| Link | Unitree GitHub |
| Hardware Architecture | Unitree 8010 hub motors |
| Core Features | Only includes leg structure, official Isaac Gym training environment provided |
| Evaluation | Large company technology downscaling, high motor reliability and excellent algorithm performance ceiling |
1.2.3 🇨🇳 AlexBot (Alexhuge1)
| Project | Description |
|---|---|
| Link | Github |
| Hardware Architecture | Self-made/modified brushless motors + ODrive or similar FOC drivers |
| Core Features | Personal geek project, adapted to Humanoid-Gym |
| Evaluation | Hardcore DIY representative, suitable for in-depth research on motor control and mechanical design |
1.2.4 🇨🇳 HighTorque & FFTAI
| Project | Description |
|---|---|
| Link | HighTorque | FFTAI |
| Evaluation | Leaning towards commercial products. HighTorque is suitable as a teaching tool; FFTAI is suitable for university laboratory procurement |
II. OpenDuck Development Workflow
flowchart LR
    A[🛠️ Modeling & Simulation] --> B[🏃 Motion Generation]
    B --> C[🧠 Reinforcement Learning]
    C --> D[🖨️ Hardware Construction]
    D --> E[🚀 Runtime Deployment]
2.1 Phase 1: Model and Simulation Preparation
Reference: prepare_robot.md
| Step | Tool/Operation | Output |
|---|---|---|
| 1. Modeling & Export | Solid Works / Onshape + onshape2robot | URDF file |
| 2. MuJoCo Configuration | Execute MUJOCO compile | MuJoCo XML |
| 3. Model Correction | Modify XML (add actuator, free joint) | Complete XML |
| 4. Simulation Verification | simulate to confirm scene | ✅ |
2.2 Phase 2: Motion Generation
Repository: reference_motion_generator
▪️ Input: Motion generator (polynomial fitting)
▪️ Output: Reference motion pkl
2.3 Phase 3: Reinforcement Learning
Repository: playground
▪️ Input: Reference motion pkl file + verified XML scene file
▪️ Core Task: Sim2Real training (train and verify robot control strategy in virtual environment)
2.4 Phase 4: Hardware Construction
Repository: Main repository
| Step | Reference Document |
|---|---|
| 3D Print Parts | print_guide.md |
| Assemble Robot | assembly_guide.md |
| Connect Circuit | open_duck_mini_v2_wiring_diagram.png |
2.5 Phase 5: Runtime Deployment
Repository: Runtime
1. System environment installation
2. Servo + IMU initialization
3. Controller Bluetooth connection
4. Foot sensor debugging
5. Sim2Real deployment
III. OpenDuck Repository Overview
| Repository | Purpose | Output |
|---|---|---|
| Open Duck Mini | Documentation + 3D print models | Parts |
| Open Duck Mini Runtime | Real robot inference + Sim2Real | – |
| Open Duck Playground | GPU parallel training strategy | .onnx |
| Open Duck reference motion generator | Gait generator | .pkl |
IV. Raspberry Pi Zero 2W Deployment Process
Although steps like flashing images, setting WiFi passwords, and enabling I2C have detailed tutorials online, this article provides a complete deployment process for reference due to encountering WiFi connection issues during actual deployment and some differences from official documentation.
4.1 Flash Image
Follow the standard image flashing process, note to select the headless version (lite version), and configure WiFi account and password in advance.
⚠️ Recommended to use the same image version as the tutorial:
2025-12-04-raspios-trixie-arm64-lite.img.xz
4.2 SD Card Expansion
After image flashing is complete, the actual available space is usually only a small portion of the SD card’s total capacity, requiring filesystem expansion.
# 32GB SD card may only show 7GB after flashing
sudo raspi-config -> Advanced options -> Expand Filesystem

# Verify
df -h
4.3 APT Source Configuration
# Backup
sudo cp /etc/apt/sources.list.d/debian.sources /etc/apt/sources.list.d/debian.sources.bak
sudo cp /etc/apt/sources.list.d/raspi.sources /etc/apt/sources.list.d/raspi.sources.bak
Modify Debian main source (/etc/apt/sources.list.d/debian.sources):
Types: deb
URIs: https://mirrors.tuna.tsinghua.edu.cn/debian/
Suites: trixie trixie-updates trixie-backports
Components: main contrib non-free non-free-firmware
Signed-By: /usr/share/keyrings/debian-archive-keyring.gpg

Types: deb
URIs: https://mirrors.tuna.tsinghua.edu.cn/debian-security/
Suites: trixie-security
Components: main contrib non-free non-free-firmware
Signed-By: /usr/share/keyrings/debian-archive-keyring.gpg
Modify Raspberry Pi source (/etc/apt/sources.list.d/raspi.sources):
Types: deb
URIs: https://mirrors.tuna.tsinghua.edu.cn/raspberrypi/
Suites: trixie
Components: main
Signed-By: /usr/share/keyrings/raspberrypi-archive-keyring.gpg
# Update
sudo apt update
sudo apt upgrade -y4.4 Reduce FTDI USB Serial Latency
# Create rule file
sudo tee /etc/udev/rules.d/99-usb-serial.rules >/dev/null <<'EOF'
SUBSYSTEM=="usb-serial", DRIVER=="ftdi_sio", ATTR{latency_timer}="1"
EOF

# Apply
sudo udevadm control --reload-rules
sudo udevadm trigger
💡 This rule only applies to FTDI drivers and does not affect CH340/CP210x.
4.5 Enable I2C
sudo raspi-config -> Interface Options -> I2C4.6 Install System Packages
sudo apt install -y git unzip i2c-tools joystick python3-pip python3-venv4.7 Configure pip Source
pip config set global.index-url https://mirrors.aliyun.com/pypi/simple
pip config set global.trusted-host mirrors.aliyun.com

# Verify
pip config list
4.8 Install Miniconda
# Create directory
mkdir download && cd download

# Download Miniconda (aarch64)
# https://repo.anaconda.com/miniconda/Miniconda3-latest-Linux-aarch64.sh

chmod +x Miniconda3-latest-Linux-aarch64.sh
./Miniconda3-latest-Linux-aarch64.sh
# Follow prompts: Enter -> yes -> Enter -> yes

source ~/.bashrc
Configure Conda Mirror:
# Clean old configuration
conda config --remove-key channels 2>/dev/null || true
conda config --remove-key default_channels 2>/dev/null || true

# Set Tsinghua source
conda config --append default_channels https://mirrors.tuna.tsinghua.edu.cn/anaconda/pkgs/main
conda config --append default_channels https://mirrors.tuna.tsinghua.edu.cn/anaconda/pkgs/r
conda config --set custom_channels.conda-forge https://mirrors.tuna.tsinghua.edu.cn/anaconda/cloud

# Set channels
conda config --add channels conda-forge
conda config --add channels defaults
conda config --set show_channel_urls yes
Create Environment:
conda create -n duck310 python=3.10 -y --repodata-fn current_repodata.json -v
conda activate duck310
4.9 Configure pip Acceleration and Install uv
⚠️ Must be executed in the
(duck310)environment
pip config set global.index-url https://mirrors.aliyun.com/pypi/simple
pip config set global.trusted-host mirrors.aliyun.com

pip install -U uv
4.10 Install OpenDuckMini Dependencies
uv pip install -U pip setuptools wheel

uv pip install rustypot==0.1.0 onnxruntime==1.18.1 numpy
    adafruit-circuitpython-bno055==5.4.13 scipy==1.15.1
    pygame==2.6.0 openai==1.70.0 RPi.GPIO
4.11 Configure Proxy (Optional)
git config --global http.proxy http://your_proxy_address:your_proxy_port
git config --global https.proxy https://your_proxy_address:your_proxy_port
Example configuration:
git config --global http.proxy http://192.168.1.196:6551
git config --global https.proxy https://192.168.1.196:6551
4.12 Install pypot and Open_Duck_Mini_Runtime
mkdir ~/project && cd ~/projectInstall Open_Duck_Mini_Runtime:
# Download: https://github.com/apirrone/Open_Duck_Mini_Runtime/tree/v2
unzip Open_Duck_Mini_Runtime-2.zip
cd Open_Duck_Mini_Runtime-2
uv pip install -e .
Install pypot:
# Download: https://github.com/apirrone/pypot/tree/support-feetech-sts3215
unzip pypot-support-feetech-sts3215.zip
cd pypot-support-feetech-sts3215
uv pip install .
4.13 Calibrate IMU
sudo usermod -aG i2c $USER
i2cdetect -y 1

cd ~/project/Open_Duck_Mini_Runtime-2/scripts/
python calibrate_imu.py
▪️ Rotate and move the robot in different directions until the terminal outputs [3,3,3,3] and displays Calibrated = True
▪️ Calibration results will be saved in the imu_calib_data.pkl file
cp imu_calib_data.pkl ~/project/Open_Duck_Mini_Runtime-2/mini_bdx_runtime/mini_bdx_runtime/4.14 Adjust Servo Offsets
cd ~/project/Open_Duck_Mini_Runtime-2/scripts
python find_soft_offsets.py
Operation Steps:
1. Use a cardboard box or stand to elevate the robot from the bottom, ensuring both feet are suspended
2. Refer to the servo position diagram for calibration: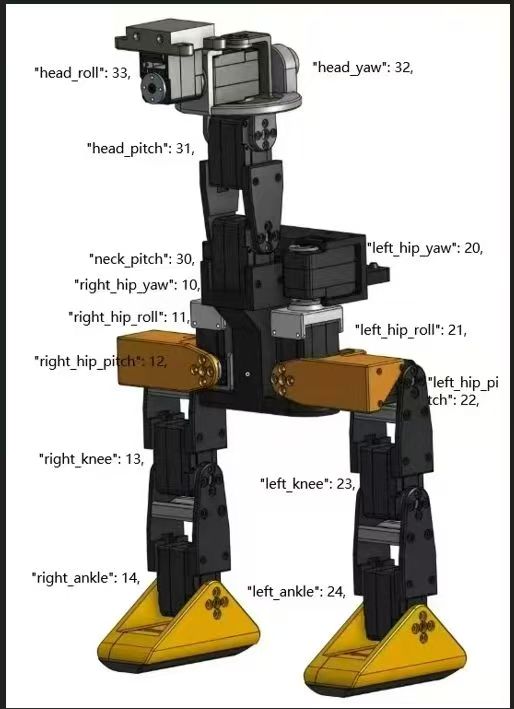
3. Put the robot in an upright position with all motors in torque-locked state
4. Unlock motors one by one, manually adjust to the correct position, then re-lock
Final State Check:
✅ Chassis (abdomen) direction remains horizontal or slightly upward
✅ Left and right legs, left and right feet are symmetrical, should completely overlap when viewed from the side
✅ When placed on a table, both feet’s micro switches should trigger simultaneously
✅ Head direction remains horizontal or slightly upward
4.15 Modify Configuration File
cd ~/project/Open_Duck_Mini_Runtime-2/
cp example_config.json ~/duck_config.json
Fill in the servo offsets in the ~/duck_config.json configuration file and add the following settings:
{
  "imu_upside_down": true
}
⚠️ Important: If the
imu_upside_downparameter is not set, the robot will exhibit abnormal oscillations during walking and cannot maintain balance correctly.
4.16 Initial Bent Leg Posture
cd ~/project/Open_Duck_Mini_Runtime-2/scripts
python turn_on.py
▪️ Under normal assembly conditions, servo position should be 0 when fully upright
▪️ After startup, the robot should be in a bent leg posture with servo torque locked
If you encounter problems, please refer to Frequently Asked Questions (FAQ)
4.17 Test Walking
cd ~/project/Open_Duck_Mini_Runtime-2/scripts

python v2_rl_walk_mujoco.py
    --duck_config_path ~/duck_config.json
    --onnx_model_path ~/BEST_WALK_ONNX_2.onnx
💡 The
BEST_WALK_ONNX_2.onnxmodel file needs to be downloaded from the official repository and placed in the home directory.
The robot will first enter the initial posture, then begin movement. Actual operation requires controller control. If you don’t have a Bluetooth controller, you can modify the code to default to forward movement.
V. RDK X5 Deployment Process
The RDK kit provides Ubuntu 22.04 system images (desktop/server versions).
The following only lists steps different from Raspberry Pi, please refer to the above for identical steps.
5.1 System Flashing
Download Image: RDK X5 Image Download
Recommended version: rdk-x5-ubuntu22-preinstalled-desktop-3.4.1-arm64.img.xz
NAND Firmware Flashing (optional, for version consistency):
Download: NAND Firmware Download
Recommended version: product_20251111.zip
5.2 Install System Packages
👉 Same as Raspberry Pi Step 6
5.3 Configure pip Source
👉 Same as Raspberry Pi Step 7
5.4 Create venv (⚠️ Different from Raspberry Pi)
The official
hobot.GPIO,hobot_dnnand other packages from Digua Robotics are precompiled for the RDK system Python environment.
Compatibility issues may occur in Conda environments, recommended to use system Python + venv virtual environment.
python3 -m venv --system-site-packages ~/duck_env
source ~/duck_env/bin/activate

# Verify GPIO module
python3 -c "import Hobot.GPIO; print('OK')"
5.5 Configure pip Acceleration and Install uv
⚠️ Must be executed in the
(duck_env)environment
pip config set global.index-url https://mirrors.aliyun.com/pypi/simple
pip config set global.trusted-host mirrors.aliyun.com

python3 -m pip install -U uv
5.6 Install Dependencies (⚠️ Different from Raspberry Pi)
python3 -m uv pip install -U pip setuptools wheel

# Note: RDK X5 uses smbus2 instead of RPi.GPIO
python3 -m uv pip install rustypot==0.1.0 onnxruntime==1.18.1 numpy
    adafruit-circuitpython-bno055==5.4.13 scipy==1.15.1
    pygame==2.6.0 openai==1.70.0 smbus2
5.7 Configure Proxy (Optional)
👉 Same as Raspberry Pi Step 11
5.8 Install pypot and Runtime
mkdir ~/project && cd ~/projectInstall Open_Duck_Mini_Runtime (RDK X5 version):
unzip Open_Duck_Mini_Runtime-2_RDK_X5.zip
cd Open_Duck_Mini_Runtime-2_RDK_X5
uv pip install -e .
Install pypot:
# Download: https://github.com/apirrone/pypot/tree/support-feetech-sts3215
unzip pypot-support-feetech-sts3215.zip
cd pypot-support-feetech-sts3215
uv pip install .
5.9 Calibrate IMU
👉 Same as Raspberry Pi Step 13 (change path to Open_Duck_Mini_Runtime-2_RDK_X5)
5.10 Adjust Servo Offsets
👉 Same as Raspberry Pi Step 14 (change path to Open_Duck_Mini_Runtime-2_RDK_X5)
5.11 Modify Configuration File
👉 Same as Raspberry Pi Step 15 (change path to Open_Duck_Mini_Runtime-2_RDK_X5)
5.12 Initial Bent Leg Posture
👉 Same as Raspberry Pi Step 16 (change path to Open_Duck_Mini_Runtime-2_RDK_X5)
If you encounter problems, please refer to Frequently Asked Questions (FAQ)
5.13 Test Walking
cd ~/project/Open_Duck_Mini_Runtime-2_RDK_X5/scripts

python v2_rl_walk_mujoco.py
    --duck_config_path ~/duck_config.json
    --onnx_model_path ~/BEST_WALK_ONNX_2.onnx
This article has added support for Logitech F710 controller.
VI. Frequently Asked Questions (FAQ)
6.1 Q1: When running find_soft_offsets.py, gravity shows horizontal posture
Problem Cause: Servo 22 or 12 is not installed in horizontal orientation, causing servo position to be approximately -1.57 radians
Solution:
1. Loosen the 4 fixing screws on the servo main disk to allow the entire leg to be freely adjustable
2. Create the following script to return the servo to center position:
cd ~/project/Open_Duck_Mini_Runtime-2/scripts  # or corresponding RDK X5 path
nano set_servo_mid.py
from mini_bdx_runtime.rustypot_position_hwi import HWI
from mini_bdx_runtime.duck_config import DuckConfig
import argparse
import time
import traceback
def zero_motor(hwi, joint_id, tol=0.02, timeout=5.0):
"""Move motor to 0 rad and wait until reached."""
print(f"Zeroing motor ID {joint_id} to 0 rad")
try:
current_pos = hwi.io.read_present_position([joint_id])[0]
print(f"Current position: {current_pos:.3f} rad")
hwi.io.write_goal_position([joint_id], [0.0])
start_time = time.time()
while True:
pos = hwi.io.read_present_position([joint_id])[0]
err = abs(pos)
print(f" pos={pos:.3f} rad, err={err:.3f}")
if err < tol:
print("✓ Zero position reached")
return True
if time.time() - start_time > timeout:
print("✗ Timeout while zeroing motor")
return False
time.sleep(0.05)
except Exception as e:
print(f"✗ Error zeroing motor ID {joint_id}: {e}")
print(traceback.format_exc())
return False
def main():
parser = argparse.ArgumentParser()
parser.add_argument("--id", type=int, required=True, help="Motor ID to zero")
args = parser.parse_args()
print("Initializing hardware interface...")
try:
duck_config = DuckConfig()
hwi = HWI(duck_config=duck_config)
print("Successfully connected to hardware")
except Exception as e:
print(f"Error initializing HWI: {e}")
print(traceback.format_exc())
return
zero_motor(hwi, args.id)
try:
hwi.io.disable_torque([args.id])
print(f"Torque disabled for motor ID {args.id}")
except Exception:
pass
if __name__ == "__main__":
main()3. Run the script, specify the servo ID to calibrate and return to center position:
python set_servo_mid.py --id 12Expected Output:
Initializing hardware interface...
Successfully connected to hardware
Zeroing motor ID 12 to 0 rad
Current position: -3.086 rad
  pos=-3.086 rad, err=3.086
  ...
✗ Timeout while zeroing motor
Torque disabled for motor ID 12
4. The servo disk will automatically rotate. After rotation is complete, fix the four screws in the upright posture.
📝 Document Update Log
▪️ As of the writing of this article, multiple tutorials for OpenDuck Mini have Python environment configuration issues
▪️ This tutorial, when used with the specified image version, has been verified in practice and can avoid common environment issues
VII. Reinforcement Learning
This section introduces how to use the OpenDuck project for reinforcement learning training, including reference motion generation, data processing, and model training.
7.1 Generate Reference Motions
Repository:
Open_Duck_reference_motion_generator
Purpose: Generate reference motion data for imitation learning
7.1.1 Clone Repository and Install Dependencies
cd ~/project/open_duck_mini_ws
git clone https://github.com/apirrone/Open_Duck_reference_motion_generator.git
cd Open_Duck_reference_motion_generator

# Install dependencies using uv
uv sync
7.1.2 Batch Generate Motions
Use the
auto_waddle.pyscript to batch generate motion files with different gait parameters
uv run scripts/auto_waddle.py
    --duck open_duck_mini_v2
    --sweep
-j8| Parameter | Description |
|---|---|
--duck | Robot model (open_duck_mini_v2) |
--sweep | Traverse all parameter combinations |
-j8 | Use 8 threads for parallel generation |
Generation Result: Approximately 240 .json motion files will be generated in the recordings/ directory
File naming format: {number}_{x_velocity}_{y_velocity}_{turn_velocity}.json
Example: 99_0.074_-0.111_-0.074.json
▪️ X-direction velocity: 0.074 m/s (forward)
▪️ Y-direction velocity: -0.111 m/s (right)
▪️ Turn angular velocity: -0.074 rad/s (clockwise)
7.1.3 Verify Generated Motions (Optional)
# Use Meshcat for visualization
uv run open_duck_reference_motion_generator/gait_playground.py --duck open_duck_mini_v2
Then open http://127.0.0.1:7000/static/ in your browser to view the 3D model animation
7.2 Process Motion Data
Purpose: Perform polynomial fitting on motion data to compress data and smooth noise
7.2.1 Polynomial Fitting
cd ~/project/open_duck_mini_ws/Open_Duck_reference_motion_generator

uv run scripts/fit_poly.py --ref_motion recordings/Output: The polynomial_coefficients.pkl file will be generated in the current directory, containing polynomial coefficients for all motions
💡 Purpose of Polynomial Fitting:
Significantly compress data volume (each joint only needs 5-10 coefficients to represent the complete motion trajectory)
Effectively smooth noise and jitter in raw data
Facilitate fast sampling and interpolation during reinforcement learning training
7.2.2 View Fitting Results (Optional)
uv run scripts/plot_poly_fit.py --coefficients polynomial_coefficients.pklThe script will display fitting curve graphs for each motion one by one to verify fitting effectiveness
7.2.3 Copy to Training Directory
cp polynomial_coefficients.pkl
   ~/project/open_duck_mini_ws/Open_Duck_Playground/playground/open_duck_mini_v2/data/
7.3 Reinforcement Learning Training
Repository:
Open_Duck_Playground
Purpose: Train walking strategy using PPO algorithm
7.3.1 Clone Repository and Install Dependencies
cd ~/project/open_duck_mini_ws
git clone https://github.com/apirrone/Open_Duck_Playground.git
cd Open_Duck_Playground

uv sync
7.3.2 Start Training
python3 playground/open_duck_mini_v2/runner.py
    --task flat_terrain_backlash
--num_timesteps 300000000| Parameter | Description |
|---|---|
--task | Training task type (flat_terrain_backlash means flat terrain + backlash compensation) |
--num_timesteps | Total training steps (300 million steps, usually takes several hours to complete) |
Training Output:
▪️ checkpoints/ directory – Saves model checkpoints during training
▪️ ONNX.onnx file – Final exported ONNX format inference model
7.3.3 Monitor Training Progress
Run the following command in a new terminal:
cd ~/project/open_duck_mini_ws/Open_Duck_Playground
tensorboard --logdir=checkpoints/
Open http://localhost:6006 in your browser to view training curves and metrics
7.3.4 Training Parameters
| Parameter | Default Value | Description |
|---|---|---|
num_envs | 8192 | Number of parallel simulation environments |
batch_size | 256 | Training batch size |
learning_rate | 0.0003 | Learning rate |
discounting | 0.97 | Discount factor (for calculating present value of future rewards) |
episode_length | 1000 | Maximum steps per episode |
7.3.5 Deploy to Real Robot
After training is complete, copy the generated ONNX.onnx model file to the robot device:
scp ONNX.onnx user@raspberry-pi:~/BEST_WALK_ONNX_2.onnxThen follow the steps in the Test Walking section to complete deployment


Leave a Reply