Your cart is currently empty!

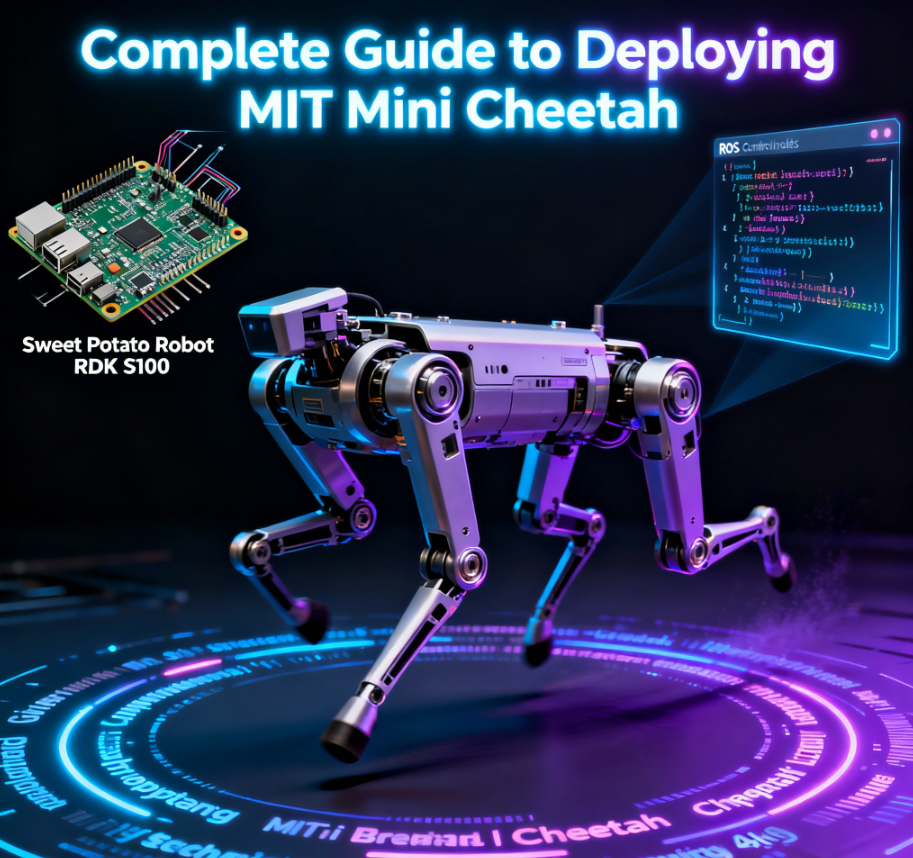
This document aims to systematically analyze the technical architecture and implementation details of the MIT Mini Cheetah robot control system, and provide detailed instructions on how to complete deployment on the D-Robotics RDK S100 development board. The content is based on publicly available materials combined with actual deployment experience, and is intended to provide complete deployment references and technical guidance for relevant technical developers.
1. Introduction to mbedOS
Developers who first encounter the MIT Cheetah project may notice that the code repository on GitHub is relatively small, and the compilation method differs from conventional projects. This is mainly because the project uses mbedOS as the underlying development framework.
The hardware module code for MIT Cheetah is relatively small. For example, the SPIne module mainly focuses on data interaction processing, while underlying hardware drivers and other basic functions are provided by mbedOS.
mbedOS is a complete software solution developed by ARM for IoT applications, and is an embedded open-source ecosystem for ARM Cortex-M series processors. For more information, please visit the mbedOS official website.
1.1 SPI Interface Initialization Example
The following example shows how to initialize the SPI interface in the SPIne module:
void init_spi(void){
    SPISlave *spi = new SPISlave(PA_7, PA_6, PA_5, PA_4);
    spi->format(16, 0);         // 16bit
    spi->frequency(12000000);   // 12M
    spi->reply(0x0);
    cs.fall(&spi_isr);
    printf("donenr");
}
1.2 CAN Bus Communication Example
The following is a typical application example of CAN bus communication:
#include "mbed.h"

DigitalOut myled(D8);
CAN can1(PD_0, PD_1, 500000);

int main() {
    CANMessage msg;
    while(1) {
        if(can1.read(msg)) {
            printf("Message received:id=%d,type=%d,%dn", msg.id, msg.type, msg.data[0]);
            myled = !myled;
        }
    }
}
2. MIT Cheetah Open Source Resources
The following are open source resource links related to the MIT Cheetah project:
2.1 Hardware Related
▪️ Motor Controller Hardware: https://github.com/bgkatz/3phase_integrated
▪️ SPIne Hardware: https://github.com/bgkatz/SPIne
2.2 Software Related
▪️ Motor Controller Software: https://os.mbed.com/users/benkatz/code/Hobbyking_Cheetah_Compact_DRV8323/
▪️ SPIne Software: https://os.mbed.com/users/benkatz/code/SPIne/
▪️ Linux Control Code (Cheetah Mini): https://github.com/mit-biomimetics/Cheetah-Software
3. MIT Mini Cheetah Robot System
3.1 Simulation Environment Configuration and Usage
After compilation is complete, you need to configure simulation environment parameters. Navigate to the config directory under the MIT main folder, open the mini-cheetah-defaults.yaml file, set control_mode and cheater_mode to 1, and set use_rc to 0. Save and exit after configuration.
Next, start the robot simulation environment. It is recommended to connect a gamepad before starting (optional, for subsequent control). Navigate to the build directory under the MIT main folder (Note: Directly entering the sim subdirectory may prevent the simulation from starting, so you need to execute from the build directory), right-click on a blank area and select “Open in Terminal”, then execute the following command:
./sim/simAfter execution, the robot simulation control interface will be displayed.
In the control interface, click “Mini Cheetah” and “Simulator” in sequence, then click the “Start” button to launch the robot simulation interface.
Next, start the robot controller. Navigate to the build/user/MIT_Controller directory under the MIT main folder, right-click on a blank area and select “Open in Terminal”, then execute the following command:
./mit_ctrl m sHere, mit_ctrl is the compiled executable file, parameter m represents the mini cheetah model, and parameter s represents simulate (simulation mode). After execution, the robot in the simulation should be able to stand up. At this point, switch to the simulation control interface and change the control_mode value to 4. You can observe the robot in the simulation switching to trot (trotting gait).
At this point, you can control the robot’s movement speed using the gamepad joystick. Readers can explore different control modes on their own. The following is the implementation method for backflip operation:
1. Change the control_mode value in the simulation control interface to 3, and the robot will enter a standing state
2. Change the control_mode value to 9, and the robot will perform a backflip action
3. After the backflip is complete, change the control_mode value to 3 again, then to 9 to repeat the backflip
Note: If the robot falls during operation, you can click the “Go Home” button in the simulation control interface to restore the robot to its initial position. If it cannot be restored, you need to restart the simulation and controller.
3.2 Combined Use of Real Robot and Simulation
When running the real robot, you need to start both the simulation interface and the controller program:
# Terminal 1: Start simulation interface
./sim/sim

# Terminal 2: Start controller (real robot mode)
./mit_ctrl m r f
Here, parameter r represents robot (real robot mode), and parameter f represents other configuration options.
4. RDK S100 Development Board Selection and System Deployment
4.1 Development Board Selection Introduction
D-Robotics provides multiple series of development boards, optimized for different application scenarios:
▪️ RDK X3 (Entry-level Edge AI/Vision): Features 5 TOPS computing power, suitable for running common CV models and small robot prototype development.
▪️ RDK X5 (Mid-range Robot/Multi-sensor): 10 TOPS computing power + richer high-speed interfaces (4×USB3, dual MIPI CSI, CAN FD, Wi-Fi 6, PoE), suitable for more complete robot integration and sensor expansion.
▪️ RDK S100 / S100P (High-end “Computing-Control Integration”/Humanoid & Multi-joint Control Scenarios): 80/128 TOPS computing power + stronger CPU (A78AE) + On-board MCU (Cortex-R52+),emphasizing “perception inference + real-time motion control” collaboration, very suitable for quadruped robots and other applications requiring high real-time performance.
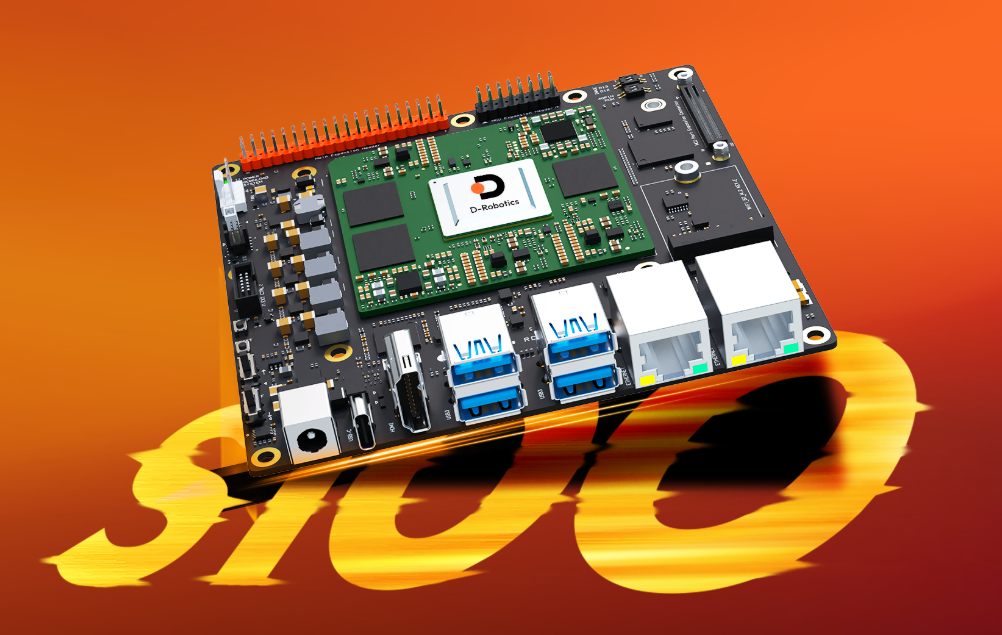
This document mainly uses the RDK S100 development board to deploy the MIT Mini Cheetah program. This development board has powerful computing capabilities and rich interfaces, capable of meeting the real-time control requirements of quadruped robots.
RDK S100 Development Board Interface Description:
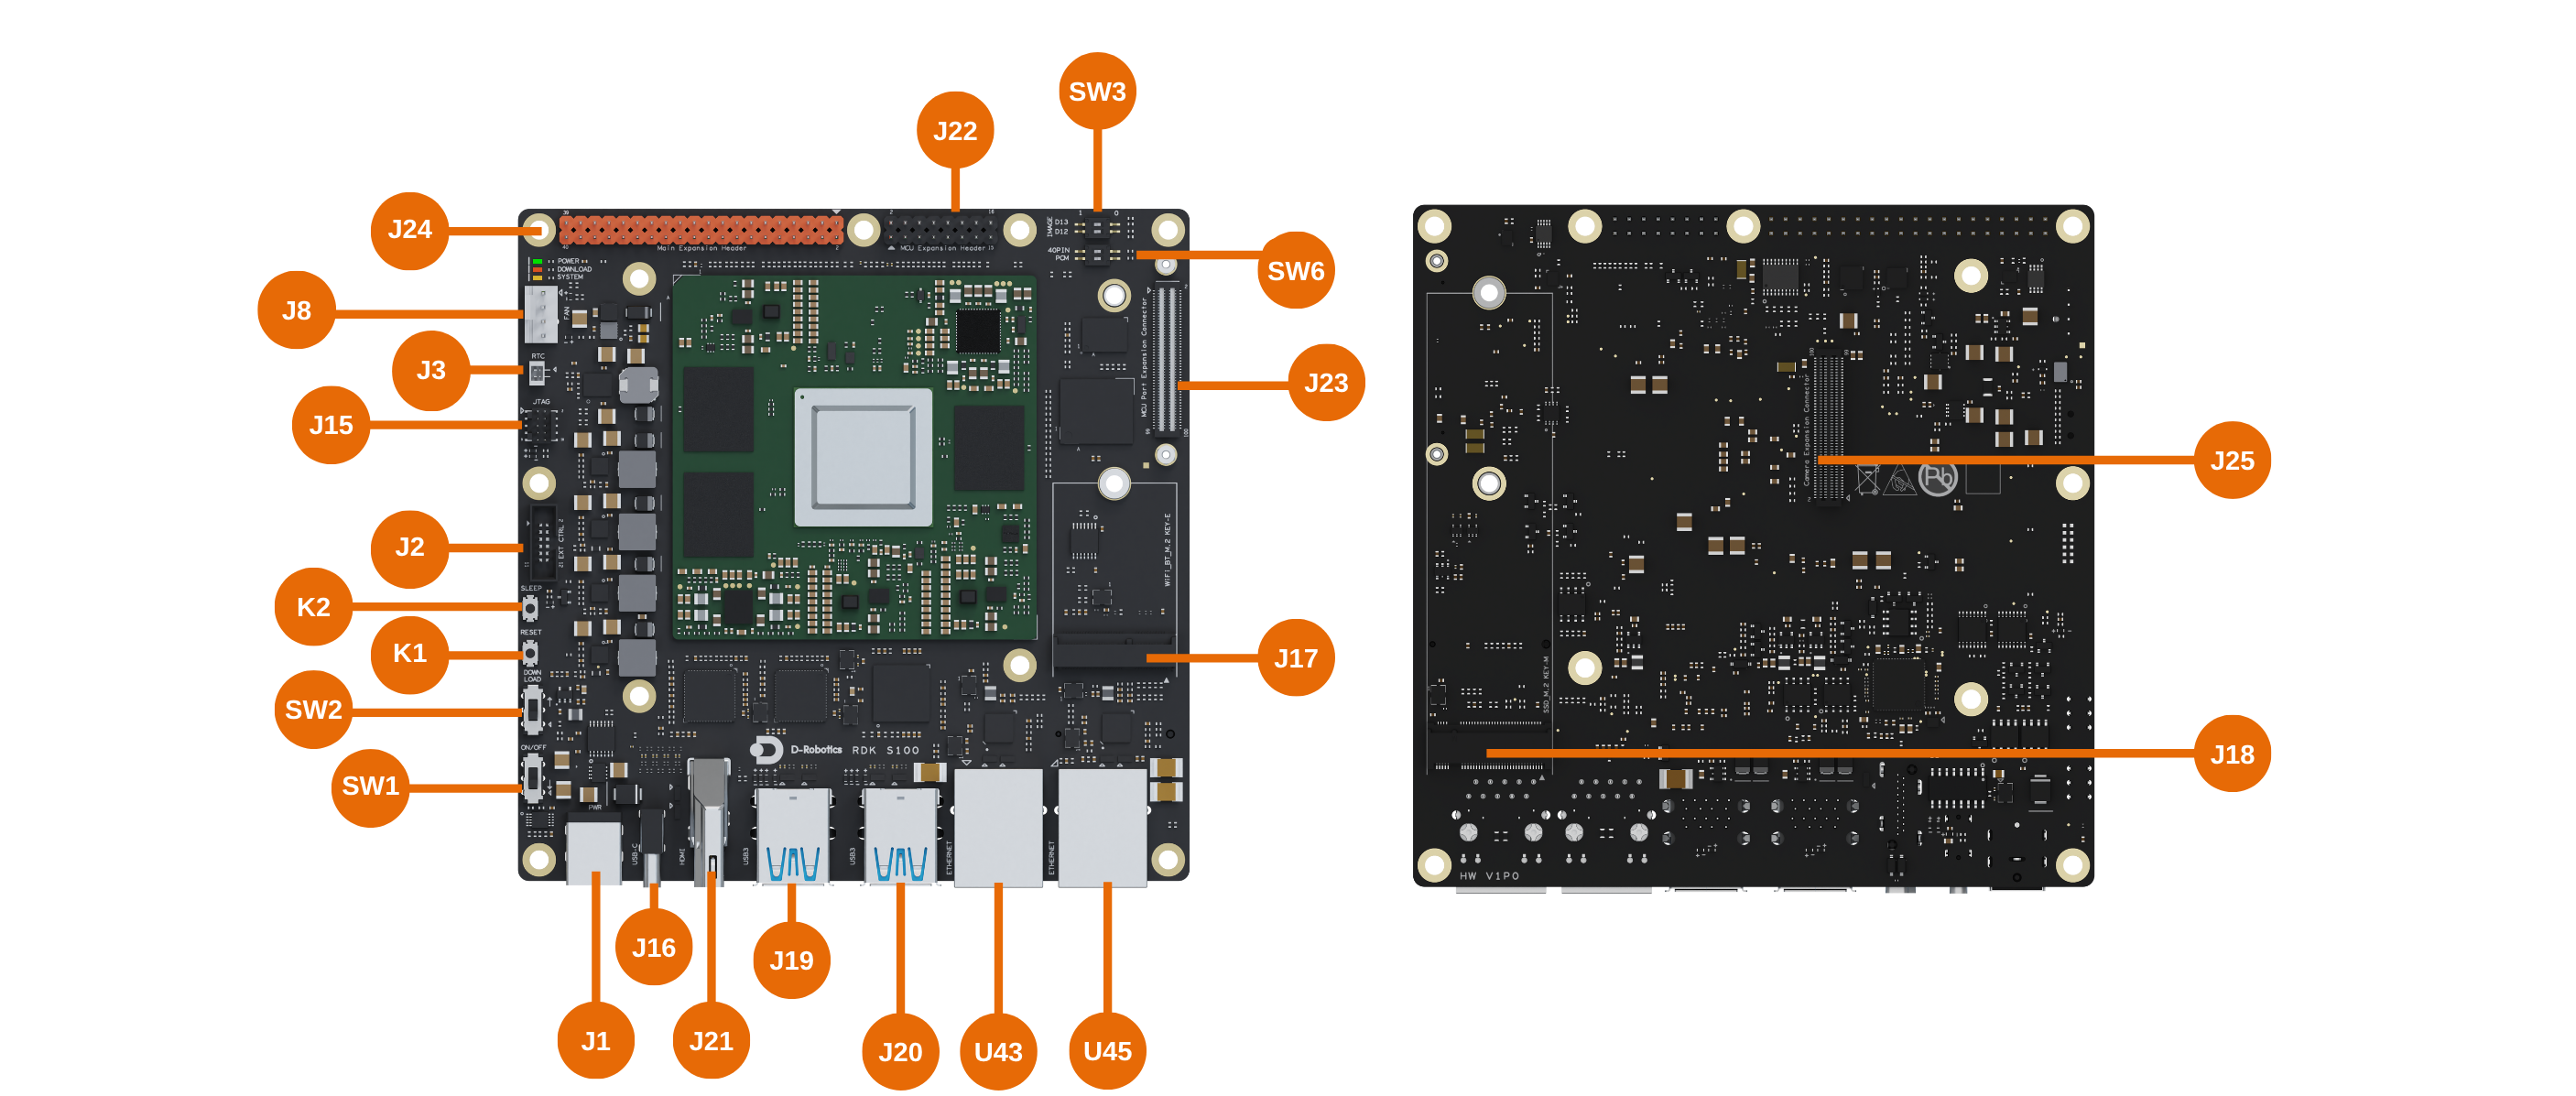
| No. | Function | No. | Function |
|---|---|---|---|
| J1 | Main board power supply interface | J22 | MCU domain 16-Pin interface |
| J2 | Main board function connector | J23 | MCU expansion board 100-Pin interface |
| J3 | RTC battery interface | J24 | 40-Pin interface |
| J8 | Fan control interface | J25 | Camera expansion board 100-Pin interface |
| J15 | Main domain and MCU domain JTAG interface | K1 | Reset button |
| J16 | Type-C interface, for flashing, Main domain and MCU domain debugging | K2 | Sleep button |
| J17 | M.2 Key E interface | SW1 | Power switch |
| J18 | M.2 Key M interface | SW2 | Flashing mode switch |
| J19&J20 | 4x USB3.0 Type-A interface | SW3&SW6 | Pin function switching DIP switches |
| J21 | HDMI interface | U43&U45 | 2x Gigabit RJ45 network ports |
5. RDK S100 System Flashing
The RDK S100 kit currently provides Ubuntu 22.04 system image, supporting Desktop graphical interaction, providing convenience for development and debugging.
Important Note: The RDK S100 comes pre-installed with a test version system image. To ensure you are using the latest version of the system and obtain optimal performance, it is strongly recommended to complete the flashing of the latest version system image according to this document.
D-Robotics official website provides detailed system flashing documentation. This document only provides an overview of key steps. For more detailed instructions, please refer to: D-Robotics Official Documentation
5.1 USB Driver Installation
Download Address: USB Driver Download
For Windows operating systems, you need to install the corresponding drivers before using ADB and Fastboot functions.
ADB and Fastboot Description:
With the improvement of embedded development board performance and functionality, modern development boards (such as RDK S100) mainly use ADB and Fastboot for system flashing and debugging, providing more functionality compared to traditional serial port methods:
▪️ ADB (Android Debug Bridge): After the system has started, used as an “instruction channel” between the computer and the development board, supporting file transfer, command execution, and other functions.
▪️ Fastboot: When the system has not started, used for flashing, unlocking, system recovery underlying tools, is the key tool for system flashing.
5.2 Complete System Flashing
Important Configuration: Currently, you need to set the SW3 DIP switch to ↑ position to use the onboard eMMC to boot the system. The current version temporarily does not support booting from M.2 NVMe SSD.
5.2.1 Download Flashing Tools and System Image
Image Flashing Tool D-Navigation:
▪️ Download Address: D-Navigation
▪️ Windows Version: Use D-navigation-win32-x64_v2.4.zip version
System Image Download:
▪️ Download Address: System Image
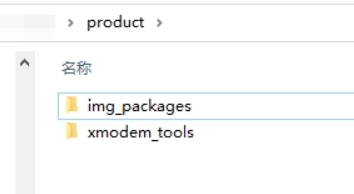
After extracting the system image, you will get a product folder. Ensure that this folder contains the img_packages folder and xmodem_tools file, with the structure as shown below:
5.2.2 U-Boot Flashing Steps
This document uses U-Boot mode for system flashing. The specific steps are as follows:
1. Development Board Power Preparation: Ensure the development board is powered off
2. Enter U-Boot Mode: Set the SW2 DIP switch to ▽ position to enter U-Boot mode
3. Turn on Power: Set the SW1 DIP switch to ▽ position to turn on power
4. Open D-Navigation Tool and complete the following configuration:
▪️ Select product model: S100
▪️ Download mode: uboot
▪️ Storage medium: emmc
▪️ Type: secure
▪️ Click “Browse” to select the product folder where the firmware is located
▪️ Select the serial port connected to RDK S100, set baud rate to 921600
▪️ Click “Start Upgrade”
Note: During the upgrade process, if you see a ‘Need manual reset’ prompt, please power cycle the development board.

6. RDK S100 System Startup and Network Configuration
6.1 System Startup
Hardware Connection:
▪️ Connect the development board to the display via HDMI cable
▪️ Connect to the network via RJ45 network port (if the development board is not equipped with a Wi-Fi card)
▪️ Keep the development board powered off, complete the connection before powering on
First Boot: The system will perform default environment configuration during the first boot, and the entire process takes about 45 seconds. After configuration, the Ubuntu system desktop will be output on the display.
Troubleshooting: If the development board has no display output for a long time after powering on (more than 2 minutes), it indicates abnormal development board startup. At this time, you need to debug through the serial port cable, check the development board startup log to diagnose the problem.
After the Ubuntu Desktop version system starts, it will output the system desktop on the display through the Display interface, as shown in the figure below:
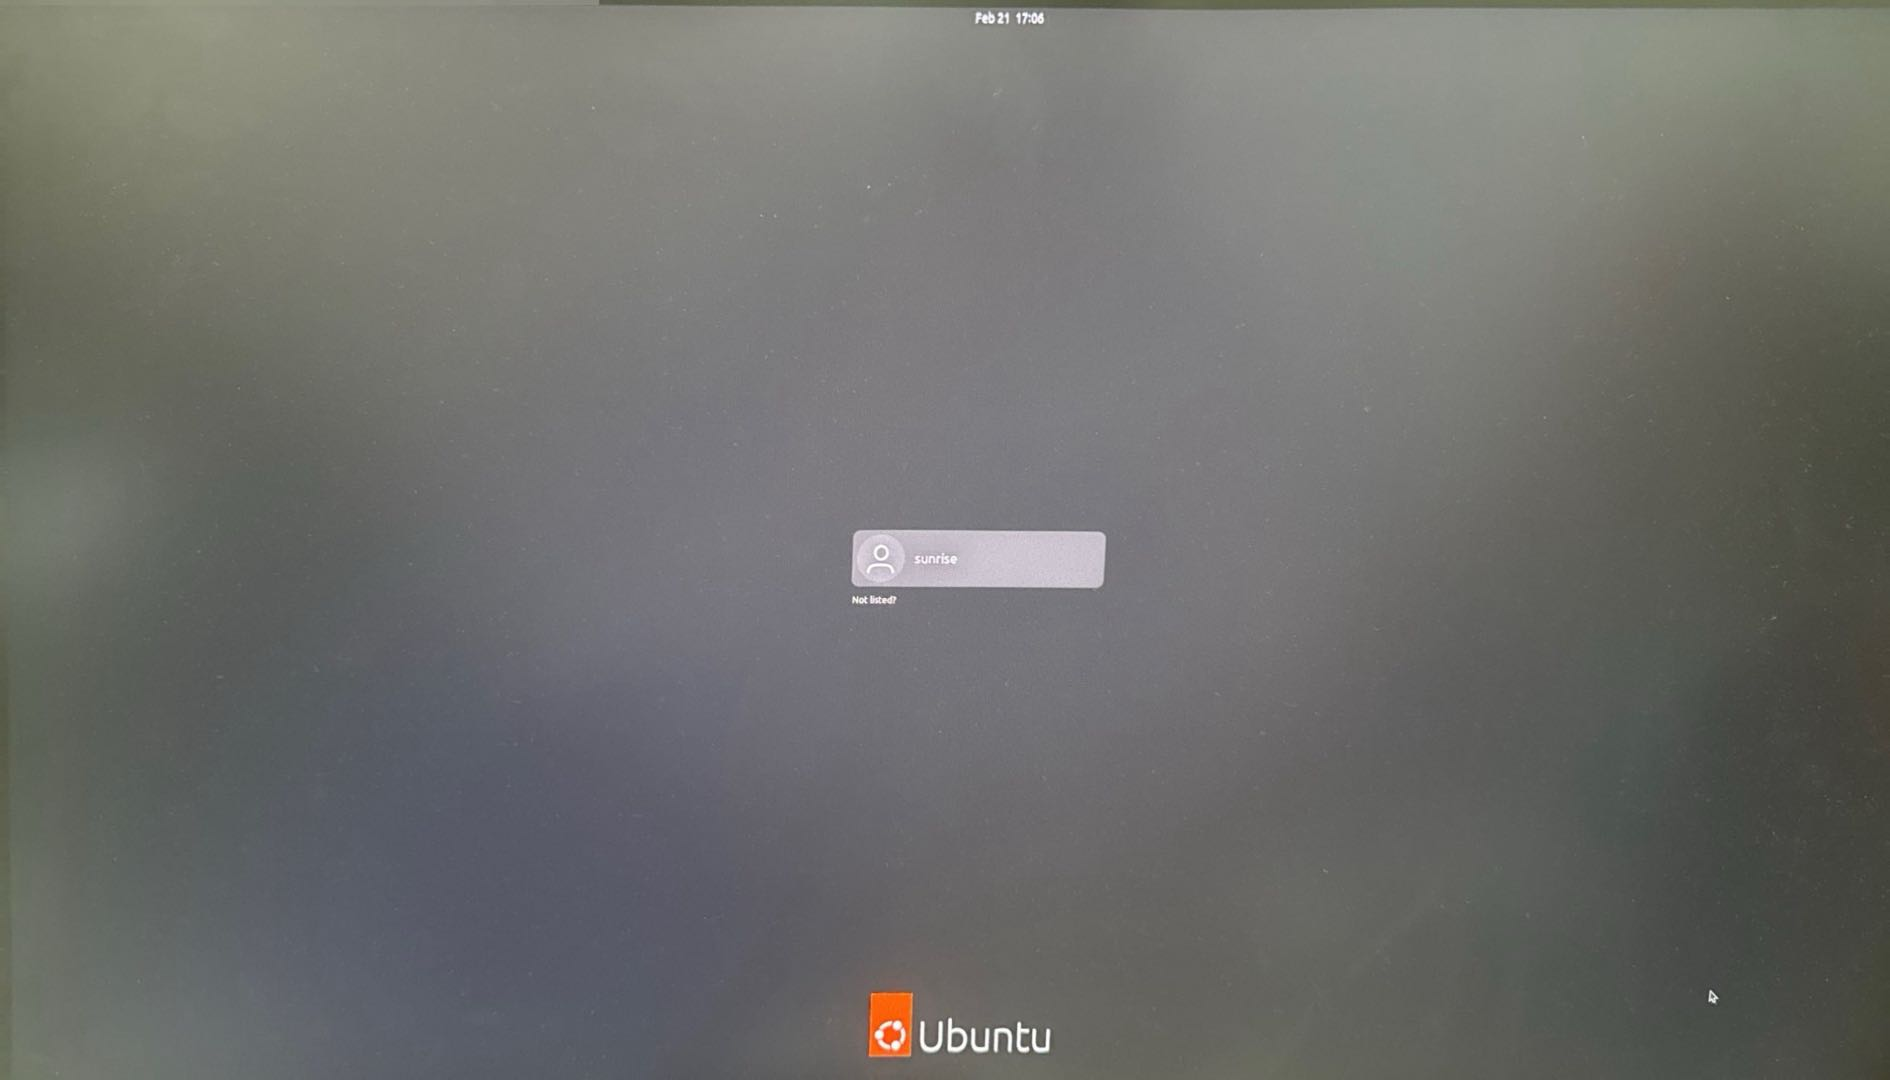
6.2 Network Configuration
Log in to the system through the serial port for network configuration. Serial port login operation is as follows:
Follow the GIF animation shown above, click OK, enter username: root, password: root to log in to the device.
After logging in, you can use the ifconfig -a command to query the development board IP address. Among them, eth0/eth1 represent wired network interfaces, and wlan0 represents wireless network interface:
root@ubuntu:~# ifconfig -a
eth0: flags=4163<UP,BROADCAST,RUNNING,MULTICAST>  mtu 1500
        inet 192.168.1.93  netmask 255.255.255.0  broadcast 192.168.1.255
        inet6 240e:39d:4d4:e2f0:283c:b3ff:fe97:bb72  prefixlen 64  scopeid 0x0<global>
        inet6 fe80::283c:b3ff:fe97:bb72  prefixlen 64  scopeid 0x20<link>
        ether 2a:3c:b3:97:bb:72  txqueuelen 1000  (Ethernet)
        RX packets 38261  bytes 55422230 (55.4 MB)
        RX errors 0  dropped 98  overruns 0  frame 0
        TX packets 21241  bytes 1485148 (1.4 MB)
        TX errors 0  dropped 0 overruns 0  carrier 0  collisions 0
        device interrupt 95

eth1: flags=4099<UP,BROADCAST,MULTICAST>  mtu 1500
        ether 92:b0:69:58:4e:df  txqueuelen 1000  (Ethernet)
        RX packets 0  bytes 0 (0.0 B)
        RX errors 0  dropped 0  overruns 0  frame 0
        TX packets 0  bytes 0 (0.0 B)
        TX errors 0  dropped 0 overruns 0  carrier 0  collisions 0
        device interrupt 96

lo: flags=73<UP,LOOPBACK,RUNNING>  mtu 65536
        inet 127.0.0.1  netmask 255.0.0.0
        inet6 ::1  prefixlen 128  scopeid 0x10<host>
        loop  txqueuelen 1000  (Local Loopback)
        RX packets 145  bytes 13618 (13.6 KB)
        RX errors 0  dropped 0  overruns 0  frame 0
        TX packets 145  bytes 13618 (13.6 KB)
        RX errors 0  dropped 0 overruns 0  frame 0
        TX errors 0  dropped 0 overruns 0  frame 0
You can obtain the router DHCP-assigned IP address through the eth0 interface for subsequent SSH remote connection.
SSH Login: For security reasons, it is recommended to use a regular user for SSH login instead of the root account.
Regular User: Username sunrise, password sunrise
6.3 System Version Confirmation
Important: System version alignment is crucial, as different versions may encounter different compatibility issues. Please confirm the system version:
sunrise@ubuntu:~$ cat /etc/version
4.0.4-Beta
Confirm that the current version is 4.0.4-Beta, consistent with the flashed image version.
7. RDK S100 Software Environment Configuration
7.1 Computer Board Selection Description
The original system of MIT Mini Cheetah runs on the UP Board, which uses a 4-core Intel Atom x5-Z8350 processor, equipped with 4GB RAM, peak power consumption of about 5W, based on x86 architecture.
UP Board has relatively few applications in the Chinese market. More common choices include Raspberry Pi and NVIDIA Jetson series. Among them, Raspberry Pi is more oriented towards general embedded applications, while the Jetson series is more suitable for image processing and AI model deployment.
The RDK S100 used in this document as a computing platform runs Ubuntu 22.04 system, equipped with a 6-core ARM Cortex-A78AE v8.2 64-bit processor (ARM architecture), with 80 TOPS AI computing power and onboard MCU (Cortex-R52+), very suitable for quadruped robots and other applications requiring “perception inference + real-time motion control” collaboration.
7.2 Download MIT Mini Cheetah Source Code
First, download the MIT Mini Cheetah source code. This document uses an adapted version:
git clone https://github.com/fuwei007/NavBot-EG02.gitAfter downloading, enter the source code directory, which we refer to as the MIT main folder.
7.3 Install Third-Party Dependency Libraries
Install the basic dependency libraries required for compilation and running:
sudo apt-get update
sudo apt -y install cmake gcc build-essential
sudo apt-get -y install openjdk-11-jdk
sudo apt -y install liblcm-dev
sudo apt-get -y install libeigen3-dev
sudo apt-get -y install mesa-common-dev
sudo apt -y install libgl1-mesa-dev
sudo apt -y install libglu1-mesa-dev
sudo apt-get -y install freeglut3-dev
sudo apt-get -y install libblas-dev liblapack-dev
sudo apt-get -y install libopenblas-dev

sudo apt install -y coinor-libipopt-dev gfortran libglib2.0-dev
sudo apt install -y openjdk-8-jdk
7.4 Install Qt
Qt is the graphics library required for the MIT Mini Cheetah simulation interface. There are two installation methods:
Method 1: Source Code Compilation Installation (Suitable for cases requiring a complete Qt development environment)
Download Qt 5.14.2 Version: Qt 5.14.2 Download Link
After downloading, execute the following steps in the directory where the file is located:
1. Select the downloaded Qt installation file, right-click and select “Properties”
2. In the “Permissions” tab, check “Allow executing file as program”
3. Right-click in this folder to open a terminal, and execute the following command (Note: qt-opensource-linux-x64-5.14.2.run should be replaced with your actual downloaded filename):
./qt-opensource-linux-x64-5.14.2.run4. Complete the installation according to the graphical interface prompts (similar to Windows installation program)
Method 2: Install Using apt (Recommended, Simpler)
You can also use apt to directly install Qt-related libraries:
sudo apt install -y libqt5 libqt5gamepad5RDK S100 Special Note: In fact, the RDK S100 system already has Qt-related environment pre-installed, so you can skip the source code compilation steps and only need to install the gamepad support library:
sudo apt install -y libqt5gamepad5-dev7.5 Install LCM
LCM (Lightweight Communications and Marshalling) is a library used for inter-process communication in the MIT Mini Cheetah system.
Download LCM 1.4.0 Version: LCM v1.4.0 Download Link
After downloading, extract the compressed package, enter the extracted folder, right-click on a blank area and select “Open in Terminal”.
Important: Due to system version compatibility requirements, you need to switch the Java environment to JDK 8:
sudo update-alternatives --config javac
# Select option 2: /usr/lib/jvm/java-8-openjdk-arm64/jre/bin/java

sudo update-alternatives --config java
# Select option 2: /usr/lib/jvm/java-8-openjdk-arm64/bin/javac
After completing the Java environment switch, execute the following commands to compile and install LCM (it is recommended to execute them one by one):
mkdir build
cd build
cmake ..
make
sudo make install
sudo ldconfig
7.6 Install Eigen 3.3.6
Eigen is a C++ template library for linear algebra, matrix and vector operations. Important: After actual testing, other versions of Eigen may have compatibility issues, so you must use Eigen 3.3.6 version.
Download Eigen 3.3.6: Eigen 3.3.6 Download Link
After downloading, extract the compressed package, enter the extracted folder, right-click on a blank area and select “Open in Terminal”, then execute the following commands (it is recommended to execute them one by one):
mkdir build
cd build
cmake ..
sudo make install
sudo ldconfig
7.7 Modify MIT Mini Cheetah Program Source Code
Since the MIT Mini Cheetah original code is mainly designed for UP Board (x86 architecture), some adaptive modifications are needed on RDK S100 (ARM architecture). The downloaded source code directory structure is shown in the figure below:

The following will detail the modifications that need to be made:
7.7.1 Modify Git Branch and Repository Address in CMakeLists.txt
Open the common/CMakeLists.txt file under the MIT main folder, and you need to modify the following content:
1. Change the Git branch from master to main (GitHub has defaulted to using the main branch)
2. Switch the googletest library’s Git repository address to Gitee mirror (faster access in China)
The modification location is shown in the figure below:
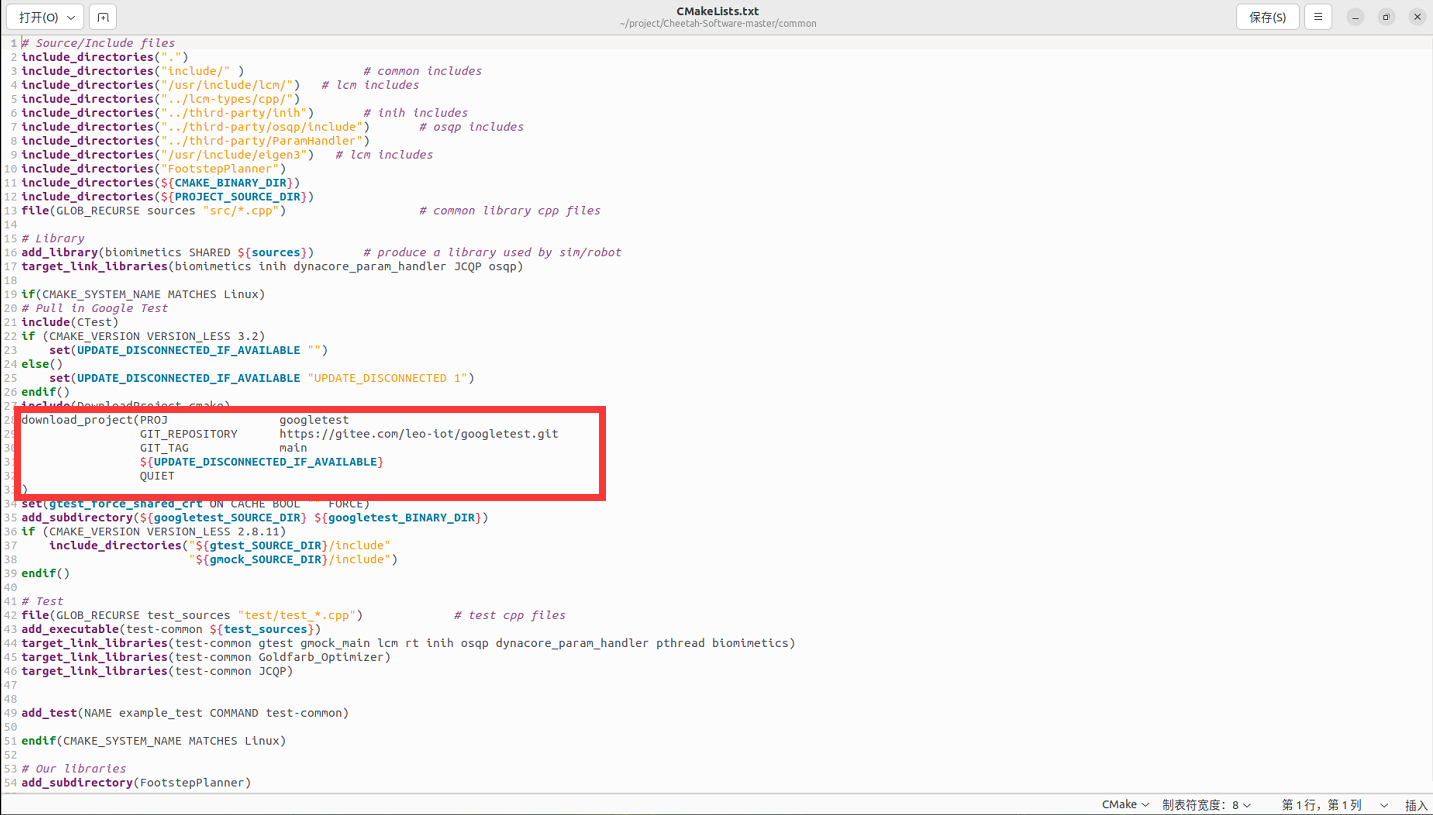
Save and exit after modification.
7.7.2 Modify Eigen3 and LCM Header File Paths
Since Eigen3 and LCM header files are installed in the /usr/include directory in the RDK S100 system, while the default path in the source code is /usr/local/include, path modification is needed.
Search and Replace: Search for the following two lines in all related files:
include_directories("/usr/local/include/lcm/")
include_directories("/usr/local/include/eigen3")
Replace with:
include_directories("/usr/include/lcm/")
include_directories("/usr/include/eigen3")
List of Files That Need to Be Modified:
Cheetah-Software-master/common/CMakeLists.txt
Cheetah-Software-master/rc_test/CMakeLists.txt
Cheetah-Software-master/robot/CMakeLists.txt
Cheetah-Software-master/sim/CMakeLists.txt
Cheetah-Software-master/user/MIT_Controller/CMakeLists.txt
RDK S100 Special Note: If you are using already adapted source code (such as the version provided in this document), you may not need to make this modification, or you may need to perform the opposite operation (change /usr/include to /usr/local/include). Please adjust according to the actual header file installation location.
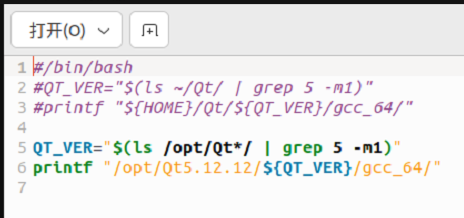
7.7.3 Modify Qt Path
Modify the file Cheetah-Software-master/scripts/find_qt_path.sh, comment out the original Qt path setting:
#printf "${HOME}/Qt/${QT_VER}/gcc_64/"Note: The path after printf should include the bin directory.
RDK S100 Adaptation: Since RDK S100 uses system-installed Qt, you should use the following method to automatically obtain the Qt path:
printf "$(qmake -query QT_INSTALL_PREFIX)/"This can automatically obtain the installation path of the system Qt without manual specification.
The modification location is shown in the figure below:
7.7.4 Fix Serial Port Header File Missing Issue
In ARM architecture Linux systems, the inclusion method of certain header files differs from x86 architecture and needs to be adapted.
Modify Source Code File: Edit the Cheetah-Software-master/robot/src/rt/rt_serial.cpp file:
1. Comment out #include <stropts.h>
2. Add #include <sys/ioctl.h> before #include <asm/termios.h>
Fix System Header File Redefinition Issue: Edit the system header file /usr/include/asm-generic/termios.h:
sudo nano /usr/include/asm-generic/termios.hAdd #ifndef _SYS_IOCTL_H at the beginning of the file, and add #endif after the related structure definition to avoid redefinition errors:
#ifndef _SYS_IOCTL_H
struct winsize {
        unsigned short ws_row;
        unsigned short ws_col;
        unsigned short ws_xpixel;
        unsigned short ws_ypixel;
};

#define NCC 8
struct termio {
        unsigned short c_iflag;         /* input mode flags */
        unsigned short c_oflag;         /* output mode flags */
        unsigned short c_cflag;         /* control mode flags */
        unsigned short c_lflag;         /* local mode flags */
        unsigned char c_line;           /* line discipline */
        unsigned char c_cc[NCC];        /* control characters */
};
#endif
7.7.5 Adapt spdlog Logging Library
spdlog is a fast C++ logging library. On RDK S100, you need to use the system-installed spdlog package instead of compiling from source.
Modify third-party/CMakeLists.txt: Replace all file content with the following:
add_subdirectory(Goldfarb_Optimizer)
add_subdirectory(ParamHandler)
add_subdirectory(inih)
add_subdirectory(osqp)
add_subdirectory(JCQP)
add_subdirectory(qpOASES)
add_subdirectory(lord_imu)
add_subdirectory(wheeltec_imu)
add_subdirectory(SOEM)

if(CMAKE_SYSTEM_NAME MATCHES Linux)
  add_subdirectory(vectornav)
endif()

# Build all 3rd-party libs with PIC (useful for shared libs)
set(CMAKE_POSITION_INDEPENDENT_CODE ON)

# ------------------------------------------------------------
# spdlog: use system package (libspdlog-dev) instead of source
# ------------------------------------------------------------
find_package(spdlog CONFIG REQUIRED)

# Provide a target named "spdlog" for compatibility with existing link lines.
add_library(spdlog INTERFACE)

if(TARGET spdlog::spdlog)
  target_link_libraries(spdlog INTERFACE spdlog::spdlog)
elseif(TARGET spdlog::spdlog_header_only)
  target_link_libraries(spdlog INTERFACE spdlog::spdlog_header_only)
else()
  message(FATAL_ERROR "spdlog CMake target not found (spdlog::spdlog / spdlog::spdlog_header_only). Install libspdlog-dev or set spdlog_DIR.")
endif()
Modify the top-level CMakeLists.txt, directly replace all content.
cmake_minimum_required(VERSION 3.5)

# Add project() to avoid CMake warning and make PROJECT_SOURCE_DIR valid
project(MiniCheetah LANGUAGES C CXX)

set(CMAKE_DISABLE_IN_SOURCE_BUILD ON)
set(CMAKE_DISABLE_SOURCE_CHANGES  ON)

if ("${CMAKE_SOURCE_DIR}" STREQUAL "${CMAKE_BINARY_DIR}")
  message(SEND_ERROR "In-source builds are not allowed.")
endif ()

set(CMAKE_COLOR_MAKEFILE ON)
#execute_process(COMMAND ../scripts/make_types.sh)

set(CMAKE_MODULE_PATH ${PROJECT_SOURCE_DIR}/cmake)

#set(CMAKE_VERBOSE_MAKEFILE ON)

option(MINI_CHEETAH_BUILD "use compiler flags for mini cheetah computer" OFF)
set(BUILD_TYPE_RELEASE TRUE)

option(NO_SIM "Do not build simulator" OFF)

# -------------------------------
# spdlog: use system libspdlog-dev
# Must be before any add_subdirectory() that links spdlog::spdlog
# -------------------------------
find_package(spdlog CONFIG REQUIRED)

# Some distros provide only header-only target; alias it to spdlog::spdlog
if(NOT TARGET spdlog::spdlog AND TARGET spdlog::spdlog_header_only)
  add_library(spdlog::spdlog ALIAS spdlog::spdlog_header_only)
endif()

if(MINI_CHEETAH_BUILD)
  SET (THIS_COM "../" )
  CONFIGURE_FILE(${CMAKE_CURRENT_SOURCE_DIR}/config.h.cmake
    ${CMAKE_BINARY_DIR}/Configuration.h)
  set(CMAKE_CXX_FLAGS "-O3 -no-pie -ggdb -Wall
  -Wextra -Wcast-align -Wdisabled-optimization -Wformat=2
  -Winit-self -Wmissing-include-dirs -Woverloaded-virtual
  -Wshadow -Wsign-promo -Werror")
  set(CMAKE_CXX_FLAGS "${CMAKE_CXX_FLAGS} -Wno-error=overloaded-virtual -Wno-error=unused-parameter")
  set(CMAKE_C_FLAGS "-O3  -ggdb -std=gnu99 -I.")
  message("**** Mini-Cheetah build enabled ****")
else(MINI_CHEETAH_BUILD)
  SET (THIS_COM "${PROJECT_SOURCE_DIR}/" )
  CONFIGURE_FILE(${CMAKE_CURRENT_SOURCE_DIR}/config.h.cmake
    ${CMAKE_BINARY_DIR}/Configuration.h)

  if(CMAKE_SYSTEM_NAME MATCHES Linux)
    set(CMAKE_CXX_FLAGS "-O3 -no-pie -march=native -ggdb -Wall
    -Wextra -Wcast-align -Wdisabled-optimization -Wformat=2
    -Winit-self -Wmissing-include-dirs -Woverloaded-virtual
    -Wshadow -Wsign-promo -Werror")
    set(CMAKE_CXX_FLAGS "${CMAKE_CXX_FLAGS} -Wno-error=overloaded-virtual -Wno-error=unused-parameter")
  elseif(APPLE)
    set(CMAKE_CXX_FLAGS "-O3 -march=native -ggdb -Wall
    -Wextra -Wcast-align -Wdisabled-optimization -Wformat=2
    -Winit-self -Wmissing-include-dirs -Woverloaded-virtual
    -Wshadow -Wsign-promo")
    include_directories("/usr/local/include/")   # lcm includes
  endif()

  set(CMAKE_C_FLAGS "-O3  -ggdb  -march=native -std=gnu99 -I.")
  message("**** Mini-Cheetah build disabled ****")
endif(MINI_CHEETAH_BUILD)

set(CMAKE_CXX_STANDARD 14)

#find_package(lcm)

add_subdirectory(robot)
add_subdirectory(third-party)
add_subdirectory(common)

if(NO_SIM)

else(NO_SIM)
  add_subdirectory(sim)
endif()

add_subdirectory(user)
add_subdirectory(rc_test)
7.8 Compile MIT Mini Cheetah Program
After completing all source code modifications, start compiling the program. Taking compiling the Mini Cheetah version as an example:
cd Cheetah-Software
cd scripts
chmod +x make_types.sh
./make_types.sh  # You may see error messages like `rm: cannot remove...`, this is normal and can be ignored

cd .. && mkdir mc-build && cd mc-build
rm CMakeCache.txt  # Clean old configuration (if necessary)

# Configure project
# -DMINI_CHEETAH_BUILD=TRUE: Build Mini Cheetah version
# -DJCQP_USE_AVX2=OFF: Turn off x86 AVX2 optimization, adapt to ARM architecture (RDK S100)
cmake -DMINI_CHEETAH_BUILD=TRUE -DJCQP_USE_AVX2=OFF ..

# Compile (adjust -j parameter according to CPU core count, $(nproc) will automatically detect core count)
make -j$(nproc)
Compilation Notes:
1. ./make_types.sh Execution: This script may prompt some errors (such as “cannot remove, no such file or directory”), these errors can be ignored and do not affect compilation.
2. CMake Configuration:
▪️ DMINI_CHEETAH_BUILD=TRUE: Specify building Mini Cheetah version
▪️ DJCQP_USE_AVX2=OFF: Turn off x86 architecture AVX2 optimization, adapt to ARM architecture (RDK S100)
3. Network Issues: When executing the cmake command, it may get stuck at the step of downloading Google-related dependencies. This is a network issue, please wait patiently.
4. Compilation Parallelism: make -j$(nproc) will automatically use all CPU cores for parallel compilation. If you encounter problems, you can use make for single-threaded compilation, but it will be slower.
8. RDK S100 Program Execution
After compilation is complete, the generated controller executable file is located in the mc-build/user/MIT_Controller/ directory. Running the program requires sudo privileges to access hardware ports.
Important: You need to execute the following commands in the mc-build directory.
8.1 Simulation Mode Execution
First, test whether the program runs normally in simulation mode:
cd mc-build
sudo ./user/MIT_Controller/mit_ctrl m s
Parameter description:
▪️ m: Represents Mini Cheetah model
▪️ s: Represents simulate (simulation mode)
8.2 Real Robot Mode Execution
After confirming that simulation mode runs normally, you can switch to real robot mode:
cd mc-build
sudo ./user/MIT_Controller/mit_ctrl m r f
Parameter description:
▪️ m: Represents Mini Cheetah model
▪️ r: Represents robot (real robot mode)
▪️ f: Represents other configuration options
Notes:
▪️ In real robot mode, please ensure hardware connections are correct, including SPIne board, motor controllers, etc.
▪️ It is recommended to fully test in simulation mode first, confirm the control algorithm is normal before switching to real robot mode
▪️ When running the real robot, please ensure there is sufficient safe space to avoid the robot losing control and causing injury
9. Advanced: Solving RDK S100 Rear Leg (SPI 0.1) Drive Issue
When migrating code from Jetson Nano to RDK S100, you may encounter a typical phenomenon: the front legs can move, but the rear legs have no response at all.
9.1 Problem Diagnosis
Enter the following command in the terminal to check devices:
ls /dev/spi*Normally, Mini Cheetah requires two SPI devices:
* `/dev/spidev0.0` (controls front legs)

* `/dev/spidev0.1` (controls rear legs)Symptom: You may only see `/dev/spidev0.0`, or there may be an unused `/dev/spidev1.0`, but `/dev/spidev0.1` is missing.
Root Cause Analysis: The RDK S100 system device tree (Device Tree) may not have enabled the second chip select signal (CS1) of SPI0 by default, causing the kernel not to load the corresponding driver.
9.2 Solution (Ultimate Hardware Modification Version)
The most reliable method is to directly modify the kernel device tree file (DTB). For convenience, a Python script has been written that automatically decompiles the system kernel, “hard-writes” the missing driver node into it, and recompiles it back.
9.2.1 Step 1: Install Required Tools
We need to install the `device-tree-compiler` (dtc) tool to compile the device tree. Ensure the development board is connected to the network, then execute:
sudo apt-get update

sudo apt-get install -y device-tree-compiler
9.2.2 Step 2: Create Fix Script
Create a script file in the terminal:
nano force_spi_patch.py9.2.3 Step 3: Copy Script Code
Copy the following code completely (comments are in English to prevent Chinese encoding issues):
import os

import glob

import subprocess

import sys

# Path to RDK S100 Device Tree files

DTB_DIR = "/boot/hobot"

# The CS1 node to insert (using spidev@1)

# reg = <0x1> corresponds to Chip Select 1

NEW_NODE = """

        spidev@1 {

            compatible = "rohm,dh2228fv";

            reg = <0x1>;

            spi-max-frequency = <0x2faf080>;

        };

"""

def patch_dts_content(content):

    # Check if spidev@1 already exists

    if "spidev@1" in content:

        return None, "Already patched"

    # Find the position of spidev@0

    # We insert spidev@1 immediately before spidev@0 for safety

    target_str = "spidev@0 {"

    if target_str not in content:

        return None, "spidev@0 not found"

    # Replace target string with NEW_NODE + target string

    new_content = content.replace(target_str, NEW_NODE + "\n\t" + target_str)

    return new_content, "Patched"

def main():

    print("=== Starting: Kernel Device Tree Patch ===")

    # 1. Check for dtc tool

    if subprocess.call(["which", "dtc"], stdout=subprocess.DEVNULL) != 0:

        print("Error: dtc tool not found. Please run: sudo apt-get install device-tree-compiler")

        sys.exit(1)

    # 2. Find all dtb files

    dtb_files = glob.glob(os.path.join(DTB_DIR, "rdk-s100*.dtb"))

    if not dtb_files:

        print(f"Error: No .dtb files found in {DTB_DIR}")

        sys.exit(1)

    count = 0

    for dtb_path in dtb_files:

        # Skip files we might have created manually before

        if "-cs1.dtb" in dtb_path:

            continue

        print(f"Processing: {os.path.basename(dtb_path)}")

        # Backup original file

        if not os.path.exists(dtb_path + ".original"):

            os.system(f"sudo cp {dtb_path} {dtb_path}.original")

        # Decompile DTB -> DTS

        dts_path = dtb_path + ".temp.dts"

        cmd_decompile = f"dtc -I dtb -O dts -o {dts_path} {dtb_path}"

        # Run decompile (suppress warnings)

        os.system(f"{cmd_decompile} > /dev/null 2>&1")

        if not os.path.exists(dts_path):

            print("  -> Decompilation failed, skipping")

            continue

        # Read and modify DTS content

        with open(dts_path, 'r') as f:

            content = f.read()

        new_content, status = patch_dts_content(content)

        if new_content:

            with open(dts_path, 'w') as f:

                f.write(new_content)

            # Recompile DTS -> DTB

            cmd_compile = f"dtc -I dts -O dtb -o {dtb_path} {dts_path}"

            if os.system(f"{cmd_compile} > /dev/null 2>&1") == 0:

                print(f"  -> Patch applied successfully!")

                count += 1

            else:

                print(f"  -> Compilation error, file not modified")

        else:

            print(f"  -> {status} (No changes needed)")

        # Clean up temporary file

        if os.path.exists(dts_path):

            os.remove(dts_path)

    print("-" * 30)

    if count > 0:

        print(f"Patch Complete! Modified {count} kernel files.")

        print("Please reboot immediately: sudo reboot")

    else:

        print("No files were modified. Please check if spidev@1 already exists.")

if __name__ == "__main__":

    main()
Press `Ctrl + O` to save, `Enter` to confirm, `Ctrl + X` to exit.
9.2.4 Step 4: Execute Fix
Run the script:
sudo python3 force_spi_patch.pyWhen you see the message `Patch applied successfully!`, it means the patch has been applied to the kernel file.
9.2.5 Step 5: Reboot and Verify
sudo rebootAfter rebooting, check again:
ls /dev/spi*At this point, you should be able to see both `/dev/spidev0.0` and `/dev/spidev0.1` existing simultaneously, and the robot’s rear legs can be controlled normally.
10. Summary
This document systematically introduces the complete process of deploying the MIT Mini Cheetah robot control system on the D-Robotics RDK S100 development board, covering all aspects from system flashing, network configuration, software environment setup, source code adaptation to program compilation and execution.
Through the detailed instructions in this document, developers can:
▪️ Understand the basic characteristics and selection basis of the RDK S100 development board
▪️ Complete the complete environment setup from system flashing to network configuration
▪️ Master the adaptation methods of MIT Mini Cheetah on ARM architecture platforms
▪️ Successfully compile and run the MIT Mini Cheetah control system
▪️ Perform robot control testing in simulation and real robot modes
It is hoped that this document can provide valuable references for relevant technical developers and promote the application and development of quadruped robot technology on more platforms.
Related Resources:
▪️ D-Robotics Official Documentation: https://developer.d-robotics.cc
▪️ MIT Mini Cheetah Open Source Code: https://github.com/mit-biomimetics/Cheetah-Software


Leave a Reply